Weekly Kid's Co-Op Linky! 4.5.12


Guess what time of the week it is??  Time for the weekly kid's Co-Op  Yeah!!  This week is full of fun Easter activities to do with kids.  Don't forget to link up after you have looked at all of the fabulous posts.  Here are a few of my Favorites from last week. 

http://www.readingconfetti.com/2012/03/colored-ice-cube-sensory-play.html
Now that the weather is starting to get nice out this would be a fun summer sensory activitiy!


I love using crazy tools for painting!  Here is a fun post about that!


This just incredible!!  We tried a project similar to this last month.  The kids will be fascinated with watching the crystals form and grow.  You can use google translate to read this post. 

I was so excited about this post because my husband already said he wanted to make me a light table this summer so now we know how! 

Here is my post for this week!
Now that you have seen a few of my favs from last week, here is the link up!
Rachel  


Montessori Easter Works


Hippity Hoppity Easter is on it's way!  I am sorry this post is a bit long but I wanted to give you a good visual of all our Easter works.  Most of these works will stay on our shelves until May. 
This is our Easter Sensory box.  It has pots, flowers, eggs and scoops. 


Flower arranging is a work that encourages fine motor development and also teaches grace and courteousy.  It is a foam floral cube inside a pot with silk flowers to arrange.

I made these letter sticks from tongue depressors and foam letters.  These can be uses for fine motor development. tactile learning, abc recognition, spelling. beginning sounds and ABC order.  In this work they choose a letter stick then build the letter with the beads. 

Mystery bag and Basket is a Montessori activity where you describe an object and the child using clues and tactile exploration to guess the object.  In this activity I used Easter grass to hide the objects.  The objects are wooden letters from Melissa and Doug.

This is a medium sized foam ball.  We called it an egg, the kids used the pipe cleaners to stick in the egg. 

These are oval shaped pieces of paper cut out and laminated.  The child grades them from smallest to largest. 

These are foam stickers from the Dollar Store.  The kids make patterns and count with them.

This is my FAVORITE Easter book.  It talks about all the fun things that go along with Easter as well as the BEST thing about Easter.

This is an extension activity I do to reinforce the story above.  The kids sort the Easter objects.  Later in the week we make a craft with these objects. 

Here are the letters from the mystery basket.  This child decided on his own to sort them by colors!  LOVE IT!!!

This  work is also from the Dollar Store.  I uses it as a fine motor activity.  The younger children take the bunny pegs out and place them in the triangle.

This month we are studying birds.  These are pattern block birds.


This is another extension to our story.  The child draws a picture of the best thing about Easter.  When they are finished they can write, label or dictate what the best thing about Easter is!!

Here is the floam again!  I like to use it for different works.  At this work the child makes an egg shape and decorates it with the items in the paper mache egg.

Last but certainly not least is balloon painting bunny ears.  This activity was so much fun I could write an entire post just on it.  We were painting bunny ears and I couldn't find our corks.  I looked through my supply closet and decided it would be fun to paint with balloons.  I blew up balloons in different sizes and we mixed red and white paints.  The kids came to the table and "sponge painted" with the balloons.  I can't wait to paint with balloons again!! 

Have a happy and meaningful Easter!!
Rachel


Easter Snacks


Easter snacks can be a great way to express creativity and now with all of the fabulous ideas swirling around on pinterest I am never going to run out of creativity!  I used to be the mom that made the crazy homemade chocolate sculptures and 4 tier cakes ect.  Don’t get me wrong, I still love a great cake making session but I have come to the reality that I am a super busy working mom and shortcuts are necessary!  The first snack I am going to talk about is one that is super easy and I literally came up with it on the fly!  Hmm seems like a theme lately.  I used pre-packaged rice crispy treats, licorice, m&m’s, marshmallows and peeps. 


First you flatten and mould the rice crispy treat into a basket.  The more you mould the treat it takes on the consistency of clay.  The next step is to peel a piece of licorice off and press it into the rice crispy basket to make a handle.  Step three is to add m&m’s and marshmallows.  Finally, add the peeps and eat it! 

Our next snack was one I found on my Pinterest Spring Board from http://www.armelleblog.com/2012/04/diy-easter-carrot-snacks.html You just need cone shaped bags, green construction paper, tape and goldfish or organic bunny crackers.  Fill the bags with the crackers.  Twist and tape the top to a point.  Finally, you tape on the green stems.  Easy Peasy Lemon Squeezy!  


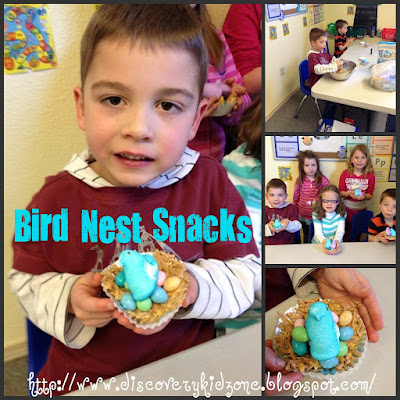
Our last snack was the bird nest treats. 

Bird's Nest Treats
12 oz. package chow mein noodles
12 oz. package butterscotch morsels

6oz. White Chocolate Morsels
robin egg whoppers

Bird peeps  

Pour the butterscotch and white Chocolate morsels in a microwave-safe bowl and place them in the microwave. Heat for 30 seconds then remove to stir. Return to the microwave and heat again for 30 seconds. Stir until melted. Add in the chow mein noodles and mix till combined. I let all of the kids have a turn stirring.  You can add a little bit of butter or peanut butter to prevent it from solidifying so quickly.  Place three egg-shaped candies in the center of each nest and the birds on top. 


Let me know if you made any of these snacks and how they turned out! 

RAchel

Fun and Easy Easter Crafts


Easter totally snuck up on me this year!  It was a blessing and a curse.  Normally I would be planning and prepping for weeks but since Spring break was last week I forced myself not to work!  If I would have prepped and planned as usual I would have done the usual crafts.  This year I just wanted to be creative and I tried to think of crafts that the kids would really enjoy doing! 
These are blow paint eggs; all you need is construction paper, paint, droppers or spoons and straws. 
First, you put three or four different colored paints into different containers.  I found these cute egg shaped ones at Ross and we also use them for works.  Use a dropper or spoon in each container.  Instruct the kids to put dabs of paint all over the egg.  When they are finished dabbing the egg they can blow with the straw all over the egg.  The paint will make small bursts of color and the kids love it!  Super easy, frugal and fun! 

We made bunny milk jug Baskets last year.  The key to making these was prep work!  I made sure I had them cut out and the felt ears hot glued on ahead of time.  The kids just put glue and cotton balls on the plastic part.  To prep the bunnies you just cut off the spout and cut out ears on the front.  Leave the handle on the back. 


Today I was in a collage mood, we made two of them.  The first collage was a cross collage.  I ordered the world paper pack from Discount School Supply.  The kids just tore pieces of the paper and tissue paper to make a collage.
 

The second collage we made today was a sticky collage.  I first saw this idea on Teach Preschool and then I saw it on no time for flash cards.  We put contact paper on the table with the sticky side up.  The kids used confetti, shredded paper, paper shapes, feathers and glitter to stick on the table.  They LOVED this activity and made a HUGE mess!!  The messier the more fun right?!  After they were done we folded the paper in half and cut out an oval shape to make an egg.  Super fun, zero prep work and displays great in the window!! 

Next I will post our Easter work trays and activities. 
Rachel

Weekly Kids Co-op 3.30.12


Weekly Kid’s Co-op

I am sorry this post is late this week.  We were on vacation and then my internet was down.  Eek talk about a blogging nightmare!!  Anyways, here is my weekly kid’s co-op link up.  Last week we had even more link ups and I am excited to share some with you.

Nurture Store Play dough Master Class
This is a super series of posts about play dough.  It starts with the recipe to play dough and has fun tips and ideas. 

Creekside learning's How to build a Tee Pee!  We made a tee pee with the kids a couple of years ago and this a fun how to project just in time for summer. 

La Dolce Vita:  The Sweet Life wrote a great post about Van Gogh's Starry Night.  We are have a great time learning about artists and I can't wait to learn more about Van Gogh.  http://www.radicchis.blogspot.com/2012/03/starry-starry-night.html
Ok ready for the list of amazing kid's ideas??  Here it is!  Link up now!  :)

Here is my post http://discoverykidzone.blogspot.com/2012/04/gardening-montessori-way.html


Gardening the Montessori way


Nourishing Nature

“Look mommy, my seed hatched!”  This phrase accompanied with an expression of elated joy in addition to many more is words I have heard over the years of gardening with kids.  What can we do to grab a hold of these teachable moments as they occur?  I am going to give you 8 simple steps to nourishing nature with your child the Montessori way. 

Step 1:

The first step is to choose what you are going to plant.  You can choose a theme garden such as a rainbow, salad or soup garden or something whimsical like a fairy garden.  Next week I will show you examples of theme gardens.  Make this a fun family project.  Allow your children to decide what they want to plant and purchase the seeds together.   Montessori’s philosophy is to teach the child to do things by themselves. 

Step 2: 

The next step is to give a lesson to your child modeling how to plant the seed in a small biodegradable plant.  Give them simple steps to model.  1.  Pour the dirt into the pot.  2.  Poke a small hole into the dirt about half way up your finger.  3.  Place the seed inside and cover it up with dirt.  4.  Water with a dropper and place in the sun on a windowsill. 

Step 3: 

Step three is to read a story about plants such as The Reason For A Flower by Ruth Heller.  Have your child make a craft or draw a picture of the parts of a plant to explain what to expect as they patiently wait for it to grow.  With keeping the Montessori Method in mind we want to teach our children the real science behind gardening this will give the task at hand much more meaning. 

Step 4:

This step is about nourishing nature in the care of a plant.  As the seedling begins to emerge you will begin to see the excitement emerging in your child.  Teach them to properly care for the plant by themselves.  Together, make a chart with pictures and steps to care for their plant.  For example:  1. 3 drops of water.  2.  Talk to your plant.  3.  Place back in the sun.  Using a dropper to water the plant will ensure it won’t get over watered and will build fine motor skills in your child. 

Step 5: 

Step 5 is to prepare the environment.  In a Montessori prepared environment the children have child-sized tools which they use to accomplish purposeful tasks and “real work” just like mom and dad.  As you prepare your garden keep these ideas in mind and allow your child to use real tools to hoe, rake and dig. 

Step 6: 

Model for your child how to dig a hole in the ground.  Dig it about double the size of the pot.  Carefully peel off the bottom part of the part and place it in the hole.  Fill in the hole level with the top of the pot with fresh soil. 

Step 7:

During this step you and your child will spend quality time nourishing nature together.  Every day go out to the garden and work together weeding and watering.  Make sure the tools are carefully placed in the same spot every time.  This way your child will know where to get them and will build responsibility by putting them back each time.  You may also build a small, low shelf in the garden, garage or shed to place your child’s tools, water pitchers and compost on. 

Step 8:

The final step is to enjoy the nature you nourished.  After you have worked hard together for some time you will have the opportunity to enjoy the fruits of your labor.  Harvest the plants and show your child how to wash and prepare them.  Plan a special salad or soup with the items from the garden.  Allow your child to prepare a meal for the family to enjoy.  This will be a wonderful way to complete the process and purpose of gardening! 
Enjoy!

Rachel Supalla